
Smartphone cameras have come a long way over the last few years, and even budget phones these days have cameras that are pretty good. You can capture some likable pictures with a sub-Rs 15,000 smartphone today. However, if you are using phones other than the Google Pixel smartphones, which have been touted to have the best smartphone camera by many, you would have noticed that picture quality on other smartphones (even some flagships) isn’t even as comparable. Fortunately, the image quality can be vastly improved by using a different camera app than the default one which comes baked into the device. Yeah, I’m talking about the Google Camera Mod (better known as GCam Mod or GCam port) that’s quite often talked about and does, in fact, make a noticeable difference to the image output of your smartphone camera.
So, if you're wondering how to install the GCam Mod on your Android smartphone, we have you covered with this in-depth guide.
Pre-Requisites
Before you can install the GCam Mod on your phone, there are a couple of things you need to check:
- Support for Camera2 API (we'll talk about Camera2 API later in this article).
- If Camera2 API is not supported, you'll need to enable it on your phone (we'll discuss that later as well).
- GCam Mod APK (you guessed it, we'll discuss that later, too)
- You'll also need patience.
What Exactly is Camera2 API?
Camera2 API is a framework that allows developers to obtain access to granular camera controls such as exposure, focus, or ISO, which they can then bake into their third-party apps in the form of advanced features to offer Android users an improved picture-taking experience. This API is a successor to Android's original camera API and utilizes a pipeline model, permitting developers to gain direct access to camera hardware.
The third-party developers can use the Camera2 API to enable full manual control over your phone's sensor, lens, and flash to provide better frame rates (30 fps burst mode), RAW capture support, HDR+ controls and other smart features. Google Camera utilizes some complex algorithms and AI functions in its app to capture some stunning photos. Here are all the camera controls that Camera2 API offers:
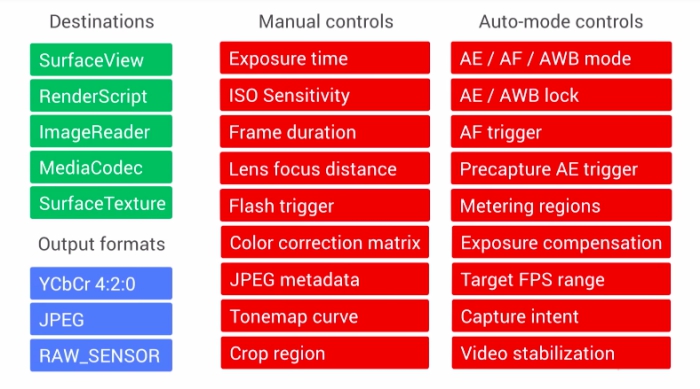
Well, I hate to break it to you, but the Camera2 API was originally introduced four years ago at Google I/O 2014 alongside the debut of Android 5.0 Lollipop. It's been quite long since the Camera2 API made its debut but not all phone makers, even today, have implemented the same on their devices.
Many flagship and mid-range smartphones now do come baked with the Camera2 API, however, it's not necessary that it's enabled by default. Some phone makers are using some Camera2 API capabilities to offer manual controls, filters support, and other nifty features to users but the complete support is still missing on a large section of phones.
In case you're wondering if your Android phone supports the Camera2 API or not, then here's a nifty method to check the same:
How to Check if Your Phone Supports Camera2 API
To see whether any of your Android smartphones support the Camera2 API, you simply need to install the Camera2 API Probe app (Free) from the Play Store. Simply install the app and launch it.
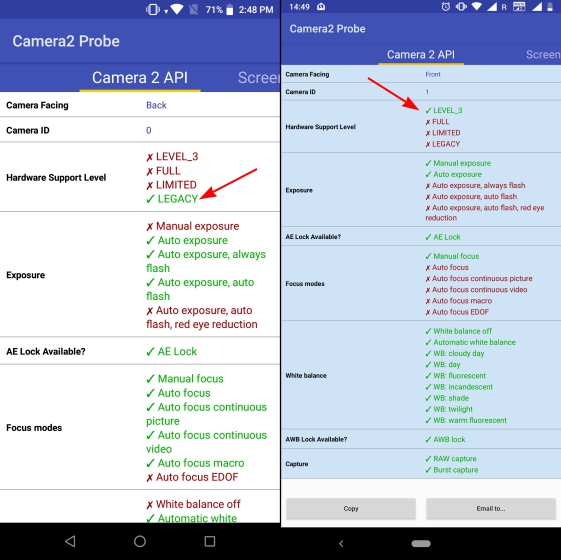
As you can see in the screenshot above, the Camera2 API Probe app lists the "Hardware Support Level" for both the rear and front cameras with the Camera ID being 0 and 1 respectively. It shows information about the Camera2 API capabilities which are supported by your Android smartphone and here's the meaning for each of the camera levels:
- LEGACY: These Android phones support only Camera1 API. No Camera2 API features are made available here.
- LIMITED: These phones support some, but not all, Camera2 API capabilities.
- FULL: These phones (including the Poco F1) support all of the major capabilities of the Camera2 API.
- LEVEL_3: These devices support YUV reprocessing and RAW image capture, along with additional output stream configurations.
This means the ZenFone Max Pro M1 does not include Camera2 API support and support for the same will need to be enabled before installing the Google Camera Mod, whereas Nokia 7 Plus is 'Level_3 compliant' and the modded camera app can directly be installed on this smartphone.
How to Enable Camera2 API
If your phone has the Camera2 API enabled, you're pretty much set. However, if your phone doesn't support the Camera2 API, don't worry, because you can enable Camera2 API on your own by rooting your device, and editing the "build.prop" file on your phone, or using Magisk to enable Camera2 API. Whichever way you choose is up to you, and we'll explain both the processes to some extent here itself.
Note: Rooting an Android device isn't a very difficult task, but it is very device dependent which is why it's not feasible to explain it in detail here. We'd recommend you to head over to XDA and search for rooting guides for your smartphone for a detailed, step-by-step tutorial.
Editing build.prop
If you want to edit the build.prop and not use the Magisk module, all you need to do is download the BuildProp Editor app (free).
- Launch the app, and give it root permissions. Then, tap on the edit icon.
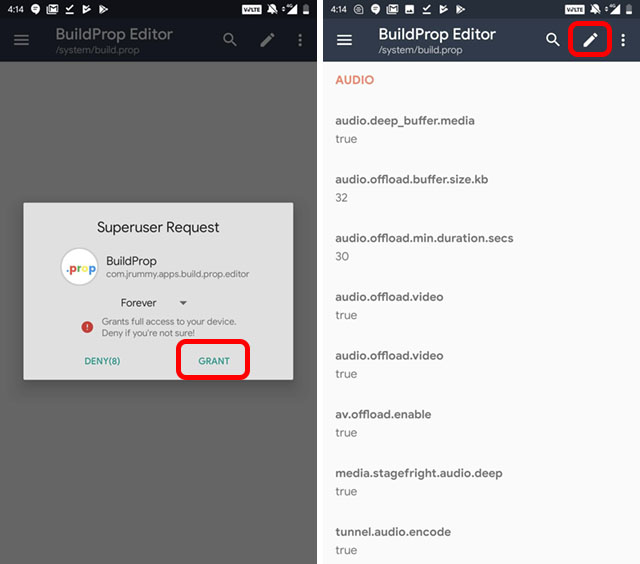
- At the end of the build.prop file, enter the following line, and then tap on the save icon.
persist.camera.HAL3.enabled=1
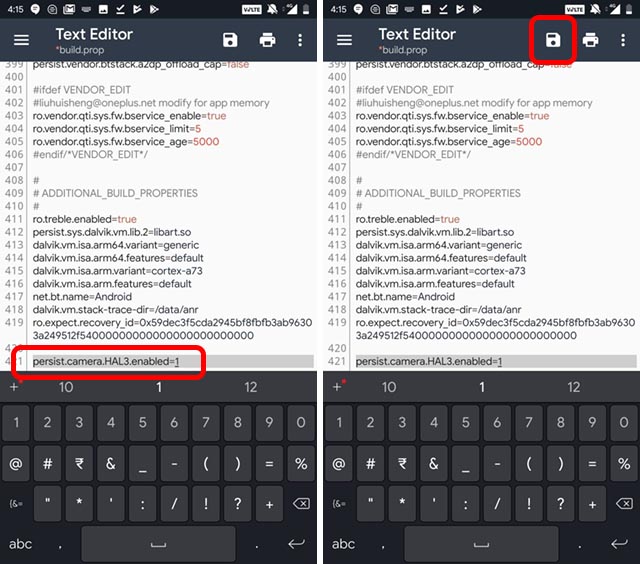
- Simply restart your phone, and the Camera2 API should be enabled now.
Using a Magisk Module
There's a Magisk Module that you can also use to enable Camera2 API on your phone. The module, called 'Camera2API enabler' is available via XDA, and you can simply install it on your phone using the Magisk Manager, and it'll enable the Camera2 API for you.
How to Install Google Camera Mod on Your Android Phone
Once you've enabled the Camera2 API on your phone, or if you've skipped all those things because your phone already has the Camera2 API enabled, you just have to install the Google Camera Mod on your phone.
Choosing the mod perfect for your phone is a little bit of a trial and error kind of deal, but you can head over to this website and check out the available Google Camera mods for your phone. For the most part, if developers like Arnova8G2 are developing a mod for your phone, it should be the best one out there.
Note: If you're unable to figure out the best Google Camera Mod for your phone, just comment down below, and we'll guide you personally.
1. Realme
- Realme 6 Pro (Download)
- Realme 6 (Download)
- Realme 5 Pro (download)
- Realme 5 (Download)
- Realme 3 Pro (download)
- Realme 3 (download)
- Realme 2 Pro (download or download)
- Realme 1 (Download)
- Realme X2 (download)
- Realme X2 Pro (Download)
- Realme X (Download or Download)
- Realme XT (download)
2. Xiaomi
- Poco F1 (download)
- Poco X2 (download)
- Redmi Note 9 Pro (Download)
- Redmi Note 9 Pro Max (Download)
- Redmi Note 4 (Download or Download)
- Redmi Note 5 Pro, 6 Pro (download)
- Redmi Note 7, 7S, 7 Pro (download)
- Redmi Note 8 Pro (download)
- Redmi Note 8 (download)
- Redmi 7 (Download)
- Redmi K20 / Mi 9T /Redmi K20 Pro (download)
- Redmi 8 (download)
- Mi A3 (download)
- Mi A2 (Download)
- Mi A1 (Download)
- Mi A2 Lite (Download)
3. Asus
- ZenFone Max Pro M1 (Download if you are on Android P, Download if you are on Android Q)
- Asus ZenFone Max Pro M2 (download)
- Asus 6, 6Z (Download APK, XML Config for Android 10 / Download APK for Android 9)
- Asus Zenfone 5Z (Download for Pie, Download for Q)
4. Nokia
- Nokia 7.1 (download)
- Nokia 7.2 (download)
- Nokia 6.1 Plus (download)
- Nokia 6.1 (Download for Pie, Download for Q)
- Nokia 7 Plus (download, XML)
- Nokia 8.1 (download)
- Nokia 7.2 (download)
- Other Nokia Devices (Download)
5. OnePlus
- OnePlus 3 (Download)
- OnePlus 5, 5T (Download or Download, XML Config)
- OnePlus 6, 6T (Download)
- OnePlus 7, 7 Pro, 7T, 7T Pro (Download APK, XML Config, Enable Aux Camera [Magisk Module])
6. Samsung
- Samsung Galaxy A71 (Download)
- Samsung Galaxy S10 Lite (Download)
- Galaxy S9, S9+, S10, S10+ Exynos variant (download)
- Galaxy S8 Series Exynos variant (Download)
- Galaxy Note 10, Note 10+ Exynos Variant (Download, you can try this GCam APK for other Exynos-based devices as well)
- Galaxy Note 9 Exynos variant (Download)
- Galaxy S10, S10+ Snapdragon Variant (Download)
- Galaxy Note 10, Note 10+ Snapdragon Variant (Download)
7. Motorola
- Motorola One Power (Download for Android 10, Download for Android 9)
- Moto One Action (Download)
- Moto G5 Plus, G5s Plus (Download or Download)
8. Others
- Oppo Reno 10X Zoom (Download)
- LG G7 ThinQ (Download, Config)
- Honor Play (Download)
- Honor View 20 (Download, you can try this GCam APK for other Kirin-based devices as well)
- Vivo Z1 Pro (Download)
What Difference Does the GCam Mod Make?
If you're wondering what difference the Google Camera Mod can make, we have a video on smartphone photography tips where we show how the Google Camera Mod can improve your phone's picture quality. Plus, it'll bring features like Night Sight to your phone as well, depending on whether or not the developer has implemented those features yet.
Take Better Pictures with Google Camera on Any Android Phone
So that ends our guide on how to install the Google Camera mod on any Android phone. Hopefully, you were able to get the Google Camera mod running on your phone without too much of a hassle. However, if you run into any problems, just comment down below and we'll try to help you out for sure.
Comments
Post a Comment